*NOTE: Any customization/modification performed will void the warranty if it results in damage to the guitar.
Tyler Variax JTV-69 - Trem Set-up (for the Summer 2011 version) Oct.30, 2011
Background: After a one year wait, when I received my JTV-69 in mid September 2011, I was surprised to find the tremolo was not stable. So I contacted Line 6 and got an RMA # and earlier this week, my guitar was returned fresh from Line6 repair with a much improved stable tremolo.
But I thought there was still room for improvement. This document describes my findings. I understand a large part of the secret to tuning stability is using the correct type internal piezo cable mount, and cable tie - both must be installed correctly- keep reading!
Of course Line 6 ships these guitars with the tremolo bar removed (and packed in the gig bag), and the Tyler Variax JTV-69 Owners Manual (as of October 2011) makes ZERO mention of how the owner should properly install and adjust the JTV-69 tremolo bar, or setup the Tremolo. They do ship a bag of half a dozen Allen wrenches, but I quickly discovered many of these wrenches are the wrong size, while many crucial wrenches are missing.
My other Major complaint is with my new JTV-69 Tremolo bar. No matter what I tried, it seemed very wobbly and would always work itself loose after 30 minutes of play. I racked it up to yet another poor "off shore" design. As a prior Variax 700 and 600 tremolo guitar owner, I just assumed the JTV-69 trem bar and trem bar tension adjust set screw was identical to those older Variax's � WRONG!
I'm a luthier for 30+ years - (worked at Valley Arts Guitar in Studio City, CA in the 1980's) and after a full teardown and rebuild of my JTV-69, I have now discovered most of the secrets to obtain the maximum utilization of the JTV-69. I discovered undocumented features of the latest "Gen 2" design summer 2011 JTV-69 Tremolo Bar and Internal Piezo Cable Ties, so I have created this document to share what I have learned.
(I should note if you own a 2nd generation JTV-69 like mine, you may be able to simply install the Tremolo Bar like a vintage Strat - that is,
How to Install the Tremolo Bar on the "Gen 2" (Summer 2011) JTV-69:
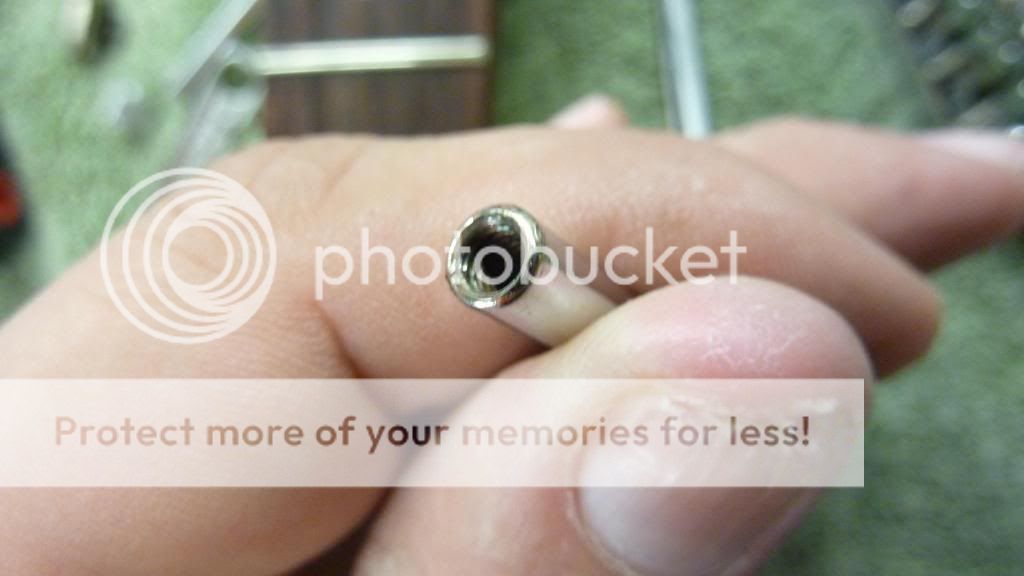
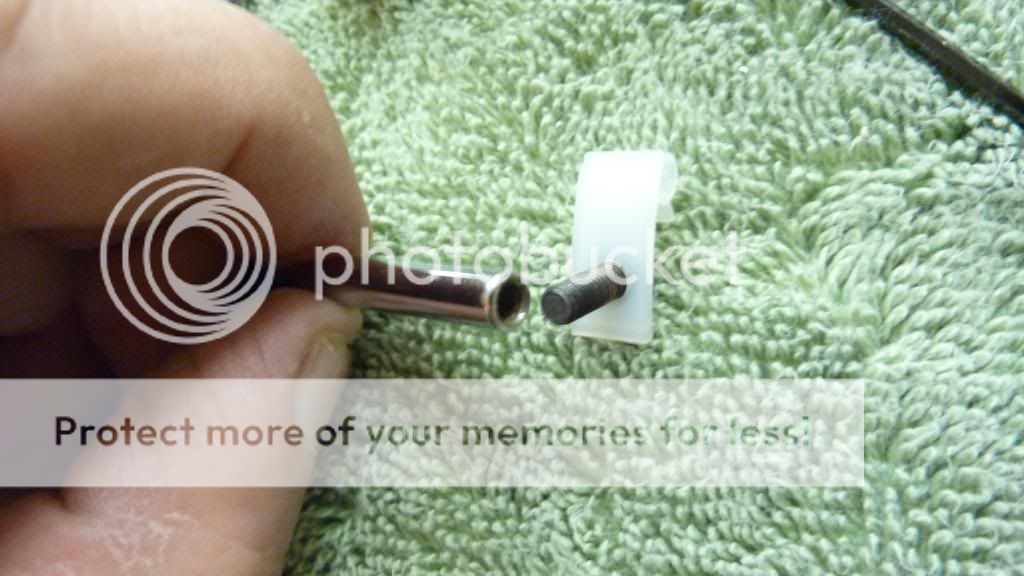
1) Be sure you have the correct "Gen 2" Tremolo Bar for your "Gen 2" JTV-69 Tremolo - it should look like this (see the threaded hole in the bottom) :
2 ) Push Tremolo Bar into the trem bar hole on the Bridge plate.
3 ) Gently rotate the tremolo bar clockwise until it catches the internal threads on the hidden internal lead screw.
4) Rotate the Tremolo bar 6 or 7 times clockwise until it bottoms out and sits fully down inside the bridge.
5) Adjust the Tremolo bar tension with the small Allen set screw that is located on the lower side of the chrome round collet on the bridge plate.
without all this disassembly! )
For Reference
First Generation JTV-69 Tremolo Bridge:
In the pic below, this is what the first generation (2010) Tyler Variax JTV-69 bridge looks like � observe the �U shaped� cast area on the bridge plate where the trem bar pushes in.

Here is an internal view of the first generation JTV-69 Bridge � observe the cable tie locations to manage the two cables between the hexaphonic piezo bridge and the DSP PC board.
2nd Generation JTV-69 Tremolo Bridge:
In the pic below is the 2nd generation (2011) Tyler Variax JTV-69 bridge. Observe the new round shaped chrome plated mounting collet on the top of bridge plate where the trem bar pushes in.
(Click on each pic for the full size view!)

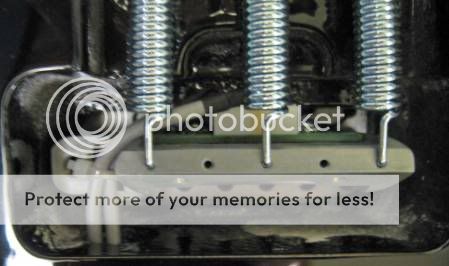
Below is a picture of an INCORRECT INTERNAL PIEZO CABLE TIE METHOD. This is exactly how my guitar was assembled this past summer 2011 by World Music in Korea when I discovered my new guitar had major tremolo stability problems.
(details and a video of my original Tremolo Stability problem is here:)
http://line6.com/support/message/319248#319248
I have since learned this cable tie method is INCORRECT! This is what my guitar looked like BEFORE my RMA warranty repair at Line 6 :
(Click on each pic for the full size view!)

Fast Forward 2 weeks later!
Upon return of my JTV-69 from Line6 warranty repair, I inspected the tremolo area and snapped some pics of the proper "factory authorized" piezo cable routing.
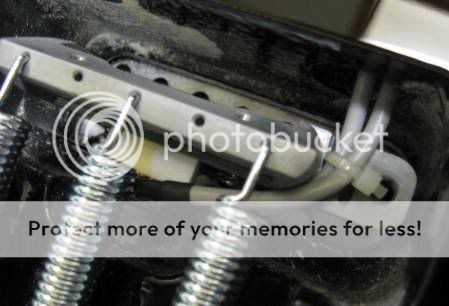
Below is an internal view of the second generation JTV-69 Bridge and piezo cable harness assembly � WITH THE CORRECT Cable clamp locations! Observe the 1st white nylon cable clamp is attached to the bridge using a black Allen panhead screw. I discovered this screw also serves as an "INTERNAL TREM BAR RETENSION SCREW", and secures the white cable clamp.

Note:
If you do not have a small cable clamp in your parts bin - if you are in the USA- go to hardware store, Lowe's , Home Depot or Radio Shack and get one of these similar Cable Clamps and modify it with side cutter pliers to resemble the official cable clamp above. Basically you want to have ONLY the lower screw mounting hole. Cut off the upper screw mount in the Home Depot clamp below:

Attention, there is an important 2nd hidden cable tie! In the pic below, observe the 2nd internal cable tie located out of sight, inside the cable feed thru hole to the DSP board inside the body. Securing these cables properly is mandatory for proper Tremolo operation. If the Piezo bridge cables are not properly managed with tie wraps placed at specific locations, they WILL create friction as the cables rub against the body and become a constant source of tremolo instability.

and another pic of this "hidden" black cable tie!

LETS GET TO WORK!
These are to the tools I used. Its important to note the JTV-69 Bridge uses a mix of both American SAE and Metric screws. You will need a good supply of both type Allen wrenches.

* Remove the Strings.
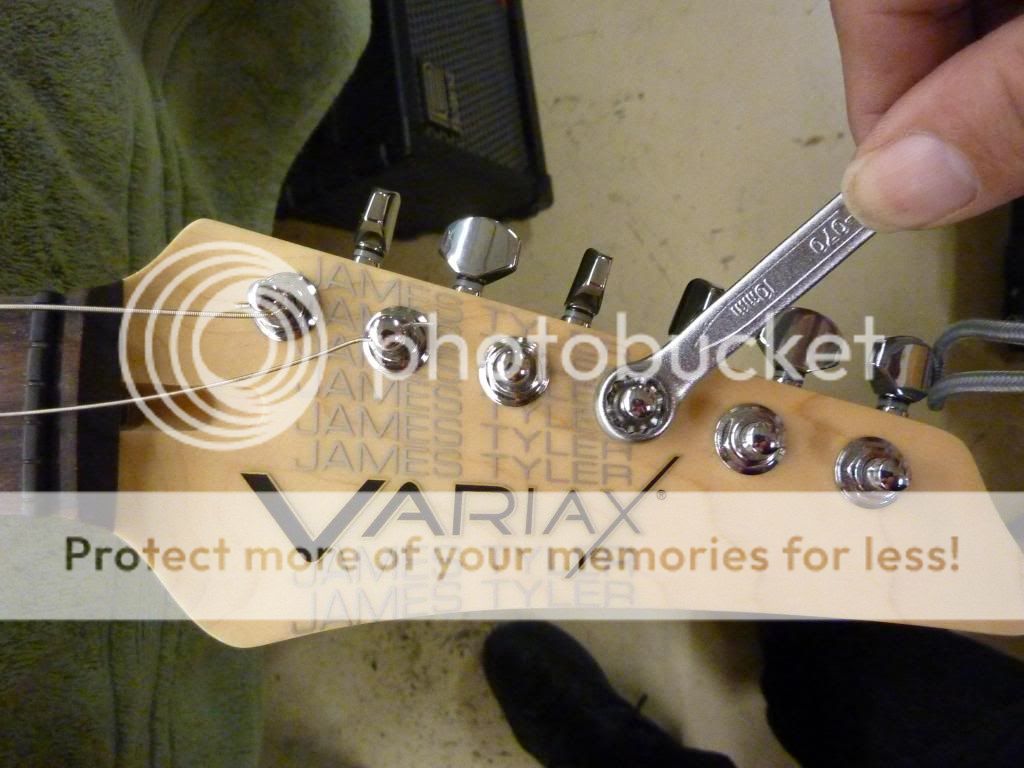
* While you have the strings off, be sure to tighten the Tuners using a 10mm wrench. Do not overtighten! (My tuners were very loose and this can create lots of tuning stability problems!)
Before we dive in too deep, lets examine and familiarize ourselves the stock JTV-69 Tremolo area and Piezo cable harness assembly. Below is the Guitar, after my RMA - fresh from Line 6 repair.
(Click on each pic for the full size view!)

In the pic above, note the stock tremolo springs - I find these can become a source of sympathetic vibration.
Fresh out of the box from the factory - my JTV-69 had a few anomalies with some of the Alt Tunings. I traced it down to the tremolo springs, which can continue to vibrate like an old Spring reverb tank, even after you have muted the strings. The sensitive Piezo bridge saddles can not distinguish a vibrating string from a vibrating rear tremolo spring.
If you ever experience a faint sound of vibrating garage door springs behind your playing, or jitter or off pitched anomalies during your Variax Alt tunings as the string vibration decays, I have a fix -keep reading!
I also found the internal factory white piezo cable clamp was still rubbing inside the body cavity and causing friction. (we will fix this too!) - see pic below:

* Carefully remove the Piezo Cable Assembly from the DSP board. At the white Molex connector "J1", gently lift to remove the cable assembly from the DSP Board.

* Carefully remove the Bridge and Piezo Cable assembly from the guitar.
It should look like this: Note the location of both white Cable clamp, and the Black Cable Tie wrap - we will retain these!

In the pic above, observe the 2nd generation Tremolo Bar mount. Its very different from the 1st generation JTV-69 Bridge! Also observe the black panhead allen screw which is securing the white cable clamp. I discovered this important screw does several things!!!
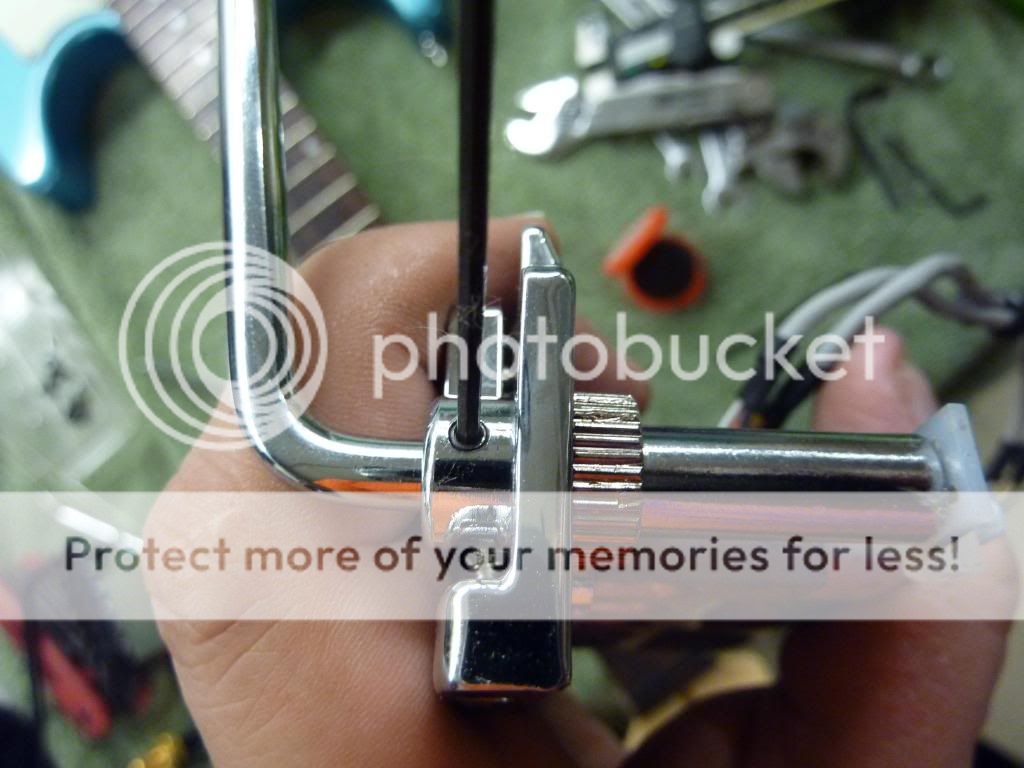
Advanced Tip: In the pic below is a Gotoh Floyd Rose bridge (on the left), and the JTV-69 Bridge (on the right):
(Click on each pic for the full size view!)

Initially I was going to "swap" the trem bar mount off the Floyd Rose bridge, and put it on the JTV-69 Bridge, as I MUCH prefer the top mounted knurled nut on the Floyd Trem Bar. This allows hand adjustment of the trem bar tension with no tools! I may yet still perform this modification, as I'm always adjusting my trem bar (I play in a '60's Surf Band: "The Dentures!) But right before I proceeded making this swap, I inspected the JTV-69 Tremolo Bar and made an interesting discovery - see pic below:
* In the above pic, observe the 2nd generation JTV-69 Trem Bar has Internal screw threads! It was designed to be mated with the internal black pan head screw, as depicted in the pics below:

* Install the Tremolo Bar to the Bridge. With the black panhead screw removed, Insert the Tremolo Bar all the way, then secure the tremolo bar to the bridge using the Black Pan Head Screw! Important - be sure the white Cable clamp gets returned to its original location!

(I should note if you own a 2nd generation JTV-69 like mine, you simply install the Tremolo Bar like a vintage Strat - that is, insert the bar into the bridge and then rotate the bar clockwise several times - to "thread" the bar onto the internal black screw without all this disassembly! )
* Next set the Trem Bar Tension using the small side mounted tension set screw:
* Carefully re-install the JTV-69 Bridge back on the guitar. Pay attention to gently pass the Piezo bridge connector and cable thru the hole to the DSP board, and reconnect the cable to the "J1" connector on the DSP board.

CLICK THE PIC BELOW

Here is my re-installed JTV-69 Bridge. Note a few important steps I performed prior to installing the bridge! :
1) I trimmed the left side of the White Cable Clamp, to provide additional clearance. This should eliminate future possiblity of it ever making any contact with the body, and causing friction and tremolo instability.
2) I put heat shrink on the Tremolo Springs - this make a big difference as it silences them from ever making minute vibrations that could be picked up by the piezo saddles - and create anomalies with alt tunings. Actually these are the factory springs from my Variax 600 - Line 6 used to always heat shrink the tremolo springs, to dampen out thier vibration!
3) I Lubricated to the two Bridge pivot points on the top Bridge plate - I used Stewmac Guitar Grease

* Here is a top view! I adjusted the spring claw for the bridge to be floating - just as it arrived from the factory.
(Interesting that my brass Trem Pivot mounts are sitting so far above the body, Its likely I will swap these out for Warmoth Locking Gotoh Trem Mounts)

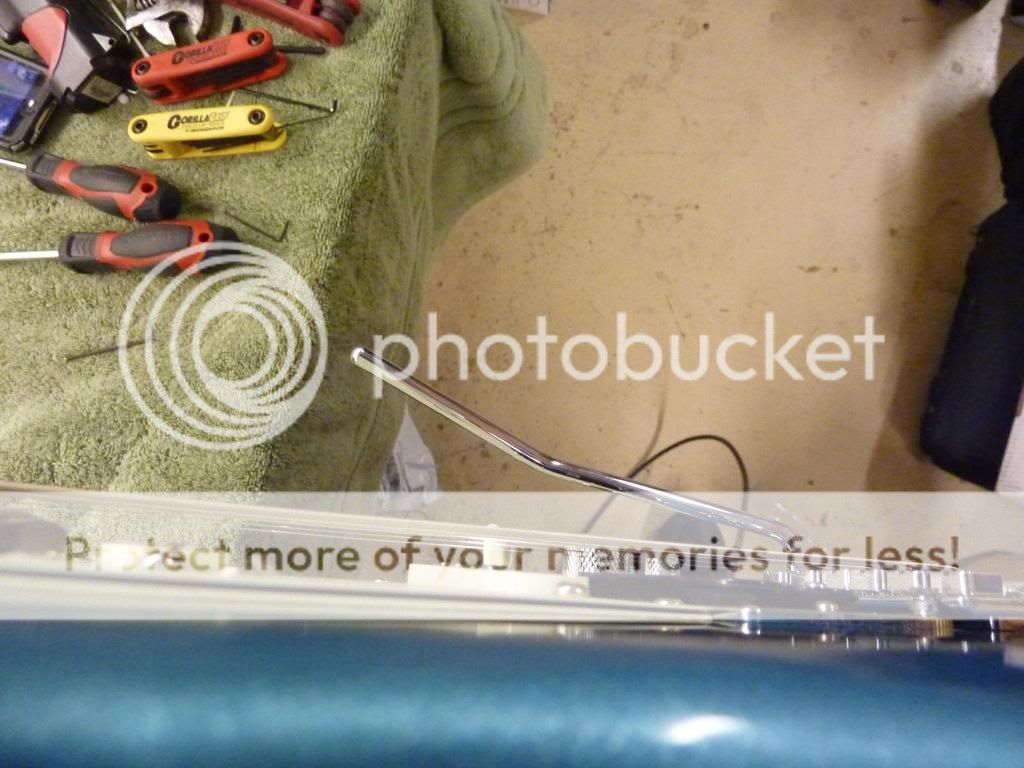
* Adjust the Bridge Plate - for minimum friction on the bridge pivot points, adjust the two Bridge Pivot Screws so the Bridge Plate is perfectly flat and level with the top of the Guitar Body. Below is a photo of an incorrect Bridge Plate height setting - note the Low E side (on the left) is set much higher than the High E side (on the right) - we will want to correct this using the top two bridge pivot adjust screws so the Bridge Plate is completely level with the top of the Guitar Body from this view.

* After setting the Bridge plate level with the top of the guitar body, then we can adjust each string's individual Bridge Saddle Height with a small 5/64 inch allen wrench - not included with the JTV-69 !
* Adjust the pickup height. I should point out the JTV-69 uses single coil pickups with strong magnets. I adjusted the pickup height same as I would a vintage Fender Strat - that is I made damn sure the bass side of the pickup is backed away from the strings. If these pickups are set too close to the strings, it kills sustain, and the strong magnets can actually "pull" the low strings sharp with periodic oscillations as seen on a strobe tuner. Lower the pickups and these oscilaltion anomalies go away, and sustain improves!
* Below is a pic of the properly installed tremolo bar. Now that it is threaded onto to the internal black screw, observe the trem bar now sits lower to the body and now feels VERY SOLID and robust !! I doubt it will pop off and fall to the floor at gigs, as it used to do!

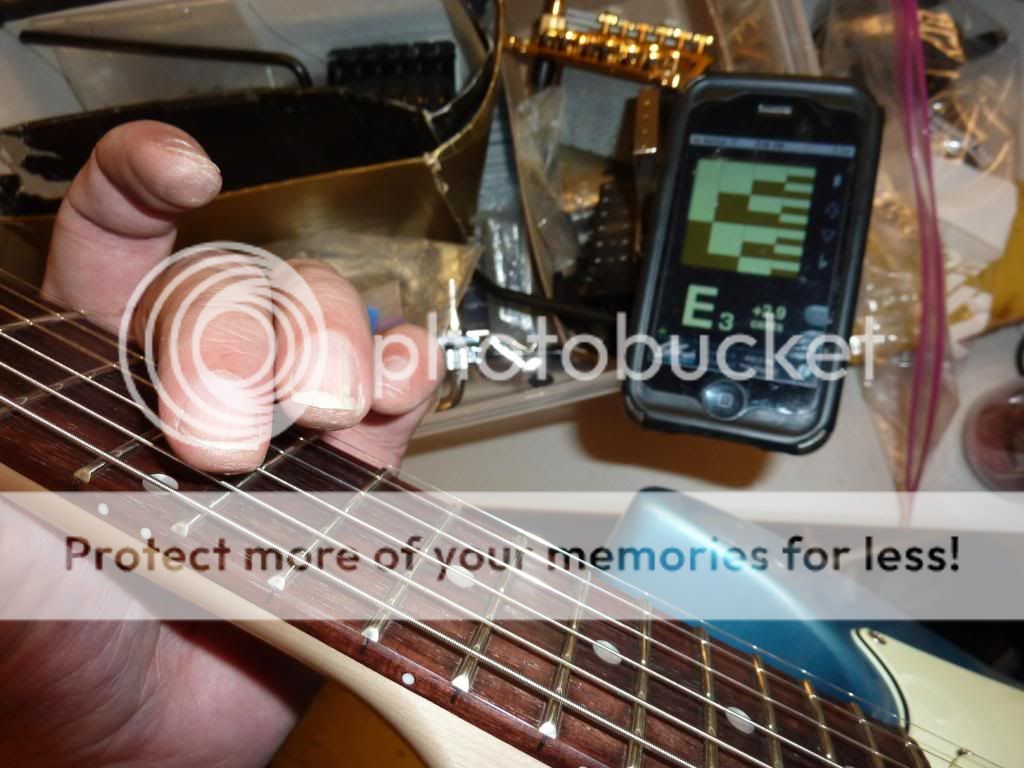
* Lets set action and re-check the intonation - I made fine adjustments to the string height,and used my old Iphone 3G with Peterson iStrobosoft application to adjust the intonation.
* Job Complete - Time to play!
Hope this info is useful for others who want to get their JTV-69 dialed in and working properly.
EDIT:
I've been asked: "Where do I obtain heat shrink tubing for the tremolo springs?"
I have used Harbor Freight 127 piece Heat Shrink Tubing Set $3.00
http://www.harborfreight.com/127-piece-heat-shrink-tubing-set-67524.html

The actual pieces I used on the Tremolo Springs from the kit above states its "10mm diameter" (metric) and it shrinks perfectly around each Spring to dampen its vibration.
There many alternative methods to dampen the tremolo springs: just google "dampen Strat Tremolo Springs" for many other methods,
"The tremolo springs on some guitars ring so loud when playing that they're audible through the amp, and add all sorts of unsavory dissonant overtones to your notes. This is a good cure."